Sunday 14 April 2013

Wool

For the Word wool I was thinking of drawing some sheep It took me a while to find out what exactly I wanted to draw. But finally I came up with some thumbnails.

I choose the bottom thumbnail for my digital drawing and i decided to do it in Corel Draw X6. So I took my thumbnail into Corel and I started to draw.


I started off with the bezier tool and I drew out the skin tones for the sheep and the boy adding a 2pt stroke and finding the right tones I wanted with the colour mixers. I used the shape tool to create circles for the boys hands and fingers than I combine them into one shape creating hands.


In the following step I worked on the wool and and the boy's clothes. I used the bezier tool to draw out the lines and the shape too to get the right curves for the wool and clothes. Than I added a fill colour to them. I also drew out the sheep's hooves in this step.


In the next step I used the shape tool and drew out the eyes of the sheep and the nostrils. Than I used the bezier tool to make the exclamation mark above the sheep's head and the boys mouth.


Afterwards I used the artistic brush tool to draw in the sheep's eyebrows, folds in the sheep's ears, curls in the wool, the boys eyes, and creases in his clothes. And than I added in some gradients to the skin tones of both the sheep and the boy and also the exclamation mark.


In the following step I lowered the boys eyes and than drew him some eyebrows with the artistic brush tool and some hair with the bezier tool. Than I added a few more gradients to the boys clothes and I drew in the thread of wool going from the sheep to the boy.


In the final step I deleted my thumbnail template, and decided to create a background for my drawing. I used two big rectangles and I filled them with gradients, one for the ground and one for the sky. Than I used the artistic brush tool and created little pieces of grass on the ground and I copied and pasted them all over the ground. And finally I used the shape tool to create 3 circles and a triangle than I selected all of them and I used the merge button at the top to merge them and create clouds.


This is my final Drawing


Wednesday 10 April 2013

Glasses

For the word glasses on illustration friday I have decided to draw half a girl's face who is wearing sunglasses in Corel Draw. Here are some thumbnails i started out with.

Next I choose the second thumbnail and brought it into Corel Draw.


Than using the Bezie tool i started to draw out my vector image. I started out with the shape of the face and neck and i used the colour mixers to get the right skin tone colour.


Afterwards still using the bezie tool, I started drawing out the  sun glasses.


Next I drew out the mouth. It was a bit difficult to get it all the right shape and I may adjust it later.


Next I drew out the shape of the hair and adjusted the lips by making them one shape instead of two and they turned out much better.


In this step I used the bezie tool to draw out teeth than i used the artistic brush tool to draw out different coloured strands of hair. And I used the brush to also draw out her nose.


Afterwards, I used The bezie tool to add a highlight to the lens of the glasses and the artistic brush tool to add highlights to her lips and glasses.


Finally I added in a rectangle for the background and I added fountain fill to the rectangle to put it all together. 


This is my final photo.


Friday 5 April 2013

Whisper Graphics

For The Word Whisper I decided to do an abstract image in photoshop, so I started out with some thumbnails for my design.

In the end I wended up going with my first thumbnail as so i opened up photoshop and started to work on my design. I started with a black fill on the background and than I used the pen too to make individual lines after which I added a brush stroke to the pen lines. Than I added an outer glow and a rainbow gradient using the Fx pannel.


Than I cose a futuristic font with which I wrote the word Graphics. Than I added a rainbow gradient, a colour overlay and an outer glow to the font to make it match my neon lines.


And finally I duplicated my layer and renamed it. Than I added a motion blur to the text  using my blur options in Photoshop. Than I moved the blurred text down to make the word Graphics look 3D and I was finished.


Tuesday 19 March 2013

Medusa


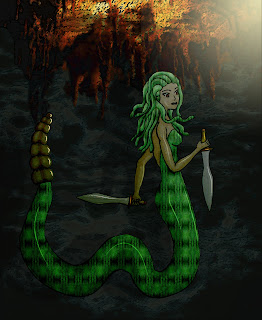
So The next word to illustrate is Myth. So, I was debating on what I should illustrate for a while and in the end I finally decided that I would draw Medusa. As a twist I want to portray her not as a monster but as a woman. So I started out with some thumbnails.


I decided to go with the second thumbnail. So I went ahed and re drew medusa on marker paper and started colouring her in.

I finished colouring in Medusa, in marker and than I started adding some basic shading.


I went in and shaded her further with marker by adding in some darker green to her snakes and layering  colours.


After I finished shading i went in and inked her with a pen using heavier strokes where there are shadows and where she is touching the ground.

After I was done drawing Medusa I went online and found some stalactite photos and a cave floor photos. Than I used the selection tool in Photoshop Cs5.5 and I put them both in one file on a black background in Photoshop.

Afterwards I used the quick selection tool to cut and copy pieces of the cave floor in order to make the back wall, and i put it behind the stalactites. Afterwards I copied the selection of the stalactites and made them black than set the layer to overlay to add more contrast.

Afterwards I Added a dark green fill layer and set it to overlay in order to bring some colour to the background. And than i used an artistic dry brush filter to make it look like it was painted and not drawn and i set the layer to Luminosity.

I brought in my drawing of Medusa and I added some highlights with the pen tool by making a path and turning it into a brush stroke. I also added a drop shadow to make her look like she is standing in the cave.

In the next step I added 2 new layers. In the first layer I added another artistic watercolour paint filter and set the layer to darken in order to darken her. On the second layer I added a grain effect and I set it to lighten to show more of the values I had drawn before.

In this step I went online and found a snake shin texture than i loaded it in Photoshop and I used a mask to added into Medusa's tail and hair and I set the layer to soft light.

In this step I used a gradient overlay on Medusa in order to add some light and shadow to her figure. I masked the gradient layer with Medusa's shape to keep it from getting into the background.


Finally To finish I added a light source with a gradient in the top corner and that was my finished artwork.

Octopus shirt


I have decided to participate in Illustration Friday. The word I have to illustrate for is Ocean. So I started out with some thumbnails for a T-shirt design that would somehow incorporate the word Ocean.


After consulting with a friend for who I am making this design for, I ended up choosing the octopus. And I have re drawn it to make it more appealing.

Finally I took the image into Adobe Illustrator and re created my drawing and coloured it in. Afterwards I put it on a T-shirt template.


Step 12

Finally To finish I added a light source with a gradient in the top corner and that was my finished artwork.


Step 11

In this step I used a gradient overlay on Medusa in order to add some light and shadow to her figure. I masked the gradient layer with Medusa's shape to keep it from getting into the background.


Step 10

In this step I went online and found a snake shin texture than i loaded it in Photoshop and I used a mask to added into Medusa's tail and hair and I set the layer to soft light.

Step 9

In the next step I added 2 new layers. In the first layer I added another artistic watercolour paint filter and set the layer to darken in order to darken her. On the second layer I added a grain effect and I set it to lighten to show more of the values I had drawn before.

Step 8

I brought in my drawing of Medusa and I added some highlights with the pen tool by making a path and turning it into a brush stroke. I also added a drop shadow to make her look like she is standing in the cave.